Struggling with an Overwatered Philodendron and looking for ways to save it? This article is at your rescue!

Overwatering Philodendron is not uncommon, but what is concerning is that most of us don’t know how to revive one that is suffering from root rot.
Read How to Identify and Save Overwatered Pilea
Signs of an Overwatered Philodendron

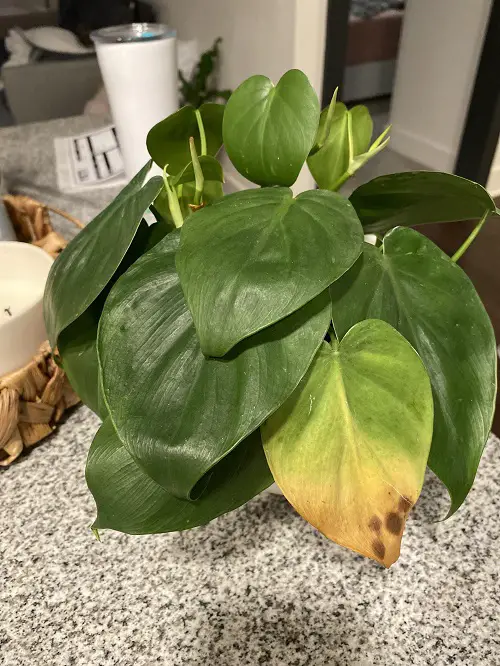
The first sign is the yellow, mushy, and drooping leaves along with very soft and fragile stems – if spot them, you have an overwatered specimen at your disposal.
The second thing you need to watch out for are the signs of mold or mildew on the soil – you can make it out easily from a discolored growing medium and a distinct, musky smell.
The last sign is the plant exhibiting a very slow growth rate (If it survives this ordeal), with smaller than usual leaves.
Learn How to Fix and Save Overwatered Peace Lily
Reasons Behind Overwatered Philodendrons

The major issue is – you’re probably watering the plants a lot. I understand that it is out of care, but it does more harm than good!
1. Inadequate Drainage
A pot without a drainage hole at the bottom is a big NO for philos, as it eliminates the chances of excess water escaping the growing medium.
2. Incorrect Soil Type
Using soil that retains too much moisture or lacks proper aeration can contribute to overwatering. A good homemade potting mix consists of three parts peat moss or coconut coir, two parts perlite or sand, and one part compost or well-rotted manure.
Adding a handful of charcoal to the mix will be beneficial, too.
3. Wrong Pot Size
You need to understand that pots don’t contribute towards making plant bigger and healthier – they result in collecting more soil than required, which stores in more water than needed, and all this is a recipe for disaster!
Use a pot size that’s one or a maximum of 2 sizes bigger than the root ball of the plant – not more than that.
How to Flush Plants Without Overwatering
Steps to Save Your Overwatered Philodendron

Start by carefully inspecting your philodendron. Check leaves and the soil. Gently remove the plant from its pot to examine the roots for signs of rot.
1. Snip Away the Damaged Parts
The first thing you need to do is to remove all the yellowing, damaged, and drooping parts of the plant – this will help it focus its energy back on the new growth.
2. Take the Plant Out of the Pot to Inspect Root Damage
Take the plant out of the pot and look at the roots. Using scissors, snip away the damaged, damp, and smelly parts – they are damaged anyway. This will make way for a fresher and healthier root system.
3. Re-Pot the Plant
Get a new pot and fill it with a fresh potting mix (I have shared the recipe above). This ensures the plant is devoid of any disease or infection that might be there in the old container or soil.
What if the Plant is Beyond Saving?
There might be chances that the plant is badly damaged and beyond saving – if that’s the case, it would be a good idea to use the healthy cuttings (If there are any) to propagate a new one.
Aftercare
Taking right care of the plant, after you have made all the changes, is necessary – start by keeping the plant in indirect and bright light for at least 5 hours a day—also, water only when the topsoil feels slightly dry to the touch.


