Growing Mushrooms in Coffee Grounds is simple and easy and in this DIY you’ll learn how to grow your own mushrooms at home.
Mushrooms grow in all sorts of places associated with waste: fungi can grow on paper, on cardboard, sawdust everywhere. Their coincident growth is rather a different thing, but the fact is that growing mushrooms is difficult. You can’t grow them in ordinary garden soil. Organic materials on which mushrooms grow are called mushroom substrates and used coffee grounds work well for this purpose because they are cohesive and already been sterilized during the brewing process.
Have a look at houseplants that love coffee here
Things you’ll Need for Growing Mushrooms in Coffee Grounds
Used coffee grounds, mushroom spawn with sawdust (oyster or shiitake), a bucket/container of 2 to 5 gallon in size, spray bottle and cellophane.
Growing mushrooms in Coffee Grounds
1. Fill the bucket or container with coffee grounds. Keep in mind, how much it is filled and draw a line over the top of the layer of coffee grounds. Empty the bucket and put coffee grounds back in their original packaging. *Don’t fill it full.
2.
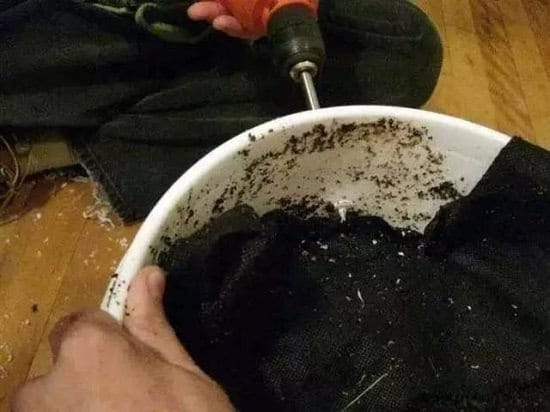
Drill a few holes around a bucket, half-way between the line you just drew and the bucket rim. These holes will be employed later for releasing of CO2, because you’ll cover the top of bucket with perforated plastic film.
3. Fill the bucket with coffee grounds again, if they are dry, moist them. Break the mushroom spawn with sawdust into the bucket and mix this in coffee grounds on top one inch layer so that the spores will distribute well.
4.
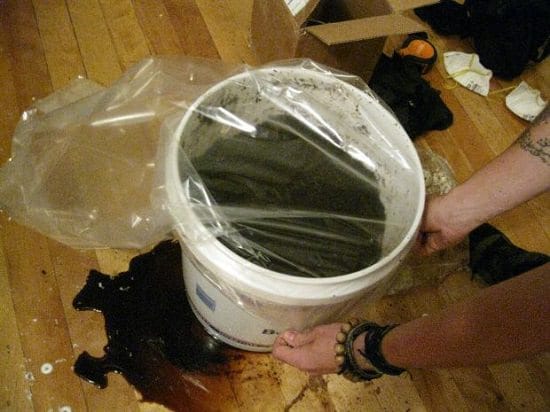
Now cover your bucket with a layer of cellophane. Poke some holes in cellophane with a pen for air. This will keep your mushrooms in appropriately moist environment and let the air in and out.
5. Keep this bucket in a dark corner of your home.
6. Remove the cellophane cover once a day to lightly spray the coffee grounds from water. Place the cover back when finished.
Care and Harvest
After 15 to 20 days, surface of mushroom substrate will start to change and you will see white patches all over.
When you see this, simply remove the cellophane layer and place your bucket in more light, a shady lit windowsill or less windy corner in your home with some light is perfect. But remember, fluctuation in temperature will be detrimental, so the place should be warm and stable.
Do not let the surface to dry out, spray the water twice in a day. Mushrooms love moist and humid substrate.
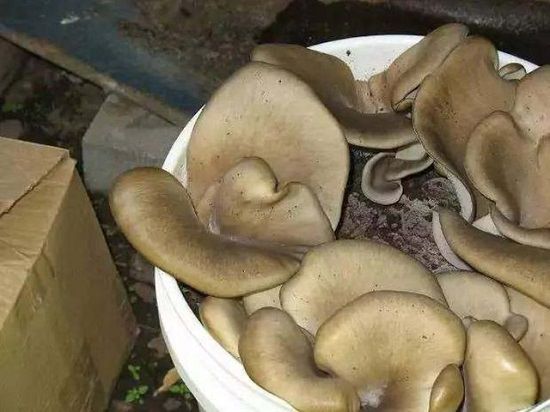
Within a week or so you’ll see tiny mushrooms emerging and in a few more days, when these mushrooms will turn fleshy and their caps turn upward, you can harvest them.
Tips & Warnings
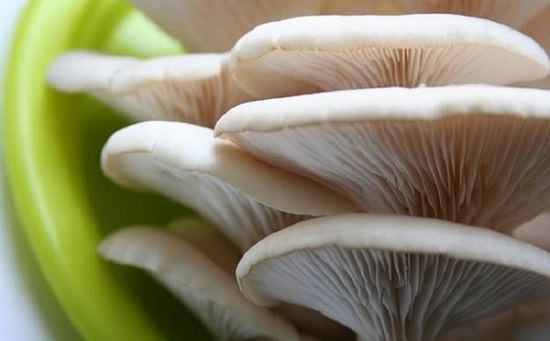
Oyster mushrooms and shiitake mushrooms are the varieties that grow well on coffee grounds, they are easiest to grow even for beginners.
Take care of hygiene before opening and closing the cellophane layer.
If you notice mold on your coffee grounds, spray less amount of water. You may also need to move it to a more cooler location. Mushrooms grow best when temperature ranges in 60 to 75 Fahrenheit (15 C – 23 C).
Check out our article on How to Grow Magic Mushrooms here!
Pin it!

Looking for Seeds of different types of Mushroom Seeds and costs & where I can purchase it!
Make mushroom seed by yourself, easy.
Pick fresh mushroom (oyster for example), pick from a big single healthy mushroom.
You’ll need clean sterile knife, cutter, 70% alcohol, and a bunsen (spiritus base fire with a wick), sterile the knife with alcohol, then burn a little on bunsen, then cut the leaf on its neck, then peel the “skin” about 2 or 3 mm. After that cut the inside part of the mushroom about as big as matches head.
A single healthy mushroom can be used as much as four (4) these “seed”
can I do it from a mushroom I bought from the supermarket?? or does it have to be fresh?
I genuinely treasure your work, Great post.
Hello
I have a few questions for Education mushrooms with brown scum like you can help
Thanks for your time and knowledge, will be experimenting soon once i have my ‘mise en place’.
Tkay
Great article but I’m a bit confused as to how to get mushroom spawn. Anywhere it can be purchased rather than trying to make it at home?
Did you find the spawn you were looking for?
Was told you can use store bought mushrooms of this type to do it by an elderly neighbor of mine and he has been gardening for 70+ years !
trying to find easy way to do it but grow white button mushrooms only UK has one with all inclusive. kit’s are very hard to find not sure why. Would like comprehensive way to do it like this one is there a way within Canada?
How many crops will 4oz of spawn make?
EB has all the growing cultures
Excellent article! I found this just in time because I just became interested in growing mushrooms while pondering what to plant in my garden for spring. I read that if fresh grounds can’t be found you can pasteurize an older mix yourself just like you would cottonseed hulls. Would this work and would pasteurization be needed for fully composted material that is no longer “hot”? Wade B on Thursday 3 January 2013