
Learn How to Propagate Spider Plants with these 5 simple methods and multiply them easily in your home for yourself or to gift to your friends!

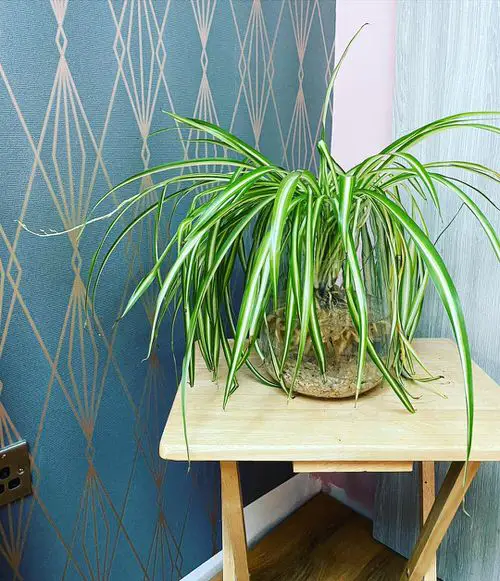
The spider plant is loved for its patterned green leaves, dangling spiderettes, low-maintenance nature, and air-purifying abilities. It only requires indirect light and moderate watering! One of the best facets of spider plants is you can multiply them easily, using one of these 5 different ways to Propagate Spider Plants, as suggested below.
Check out our article on growing spider plants here
When to Propagate Spider Plants

Spider plants can be propagated at any time of the year, but it will be most convenient and easy with a high success rate when done in warm weather, usually spring and summer in cold climates; you can even do this after the summer in fall, in moderate and warm regions. They propagate best in the temperature range of 65-95 F (18-35 C).
If you’re propagating them from spiderettes (baby plants attached to the spider plant), just wait till they form tiny aerial roots of their own. Once these roots are a bit swollen and probably a one-quarter inch in length–it’ll be the best time to plant them.
One more thing to remember is to not wait for too long. Young spiderettes comparatively root quickly because callouses form on the aerial roots of old spiderettes, prolonging the rooting process!
How to Propagate Spider Plants from Babies
What are Spider Plant Babies or Spiderettes?
After the plant establishes itself, it produces many runners that grow mini white flowers at the end. These flowers eventually make way for the tiny spider plants, also known as spiderettes. They generally appear when the days are shorter (in autumn).
This is the most common propagation method, and you can do it in a number of ways:
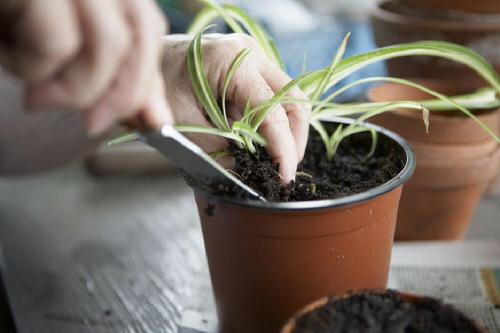
1. Growing Spider Plant Babies in Soil
- Carefully remove the babies from the mother plant by cutting them at the base. Do make sure you are not damaging spiderettes (plantlets) in the process.
- Take a small pot or container with drainage, fill it with seed starting mix or loamy soil, and plant spiderettes into it by gently pressing and covering the tiny roots with the soil.
- You can also grow them in transparent plastic boxes with a lid or use a cloche to cover them; this will work as a greenhouse and provide extra warmth and humidity.
- Mist the growing medium evenly and keep it at a spot where the plant gets warmth and bright indirect light; a wee bit of gentle morning sun is always good.
- To avoid soggy soil and disturbing roots, don’t water them with a watering can! Instead, mist the soil using a plant mister or sprayer frequently to keep the soil moist. Keep the plant in a humid area or mist it daily.
- When you notice fresh growth, it means that the plant is now established. If your question is, how long does it take for spiderettes to grow new roots and show some growth–It is one to three weeks!
2. Growing Spider Plant Babies While they’re Still Attached to the Mother Plant
When spider plants get mature, they start to grow babies that dangle down from the mother plant. You can also grow them while they are still attached.
- Place several small pots beneath the baby plants trailing down around the mother plant.
- Make their contact with the growing medium in a way that the leaves part is facing up, and the aerial roots part is facing down.
- Bury this root part 1/4 inch in the soil while they are still attached to the mother plant.
- This will make the spiderettes grow more quickly as they will get the nutrients both from the soil and through stems from the mother plant.
- After a few days, when they start to show new growth, disconnect the stem that is attaching them to the mother plant.
3. Growing Spider Plants in Water
Growing spider plants in water is a fun and easy way to propagate them. This way, you can keep this houseplant in water for a long time. However, if you’re planning to transplant them later in the soil, it’s better you rather start them in the soil from the beginning!
- All the steps mentioned above are the same, but the growing medium would be different.
- Place the baby plants in a decorative vase or jar filled with nonchlorinated water. Make sure that none of the leaves get submerged.
- Keep it at a location where the plant gets bright light. A windowsill, shelf, tabletop, or cool plant stand would be ideal!
- Change the water every 4-5 days or whenever it appears cloudy to you.
We have a detailed article on how to grow spider plants in the water here
4. Propagating Spider Plants from Division
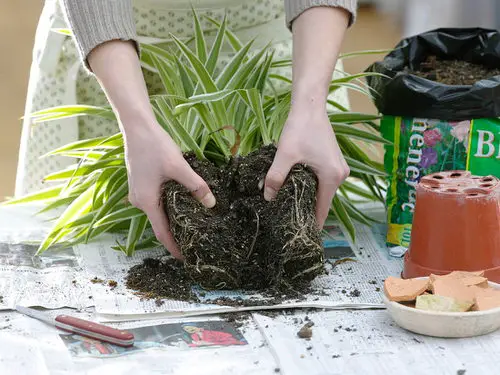
The division is another easier method for propagating spider plants. It is best done while transplanting it to a new pot.
- Take out the entire plant from the pot. Make sure you are not damaging the roots in the process.
- Look for different clumps and select the best ones to separate.
- Tap the clumps individually to see if they are loose. In that case, you can simply pull them apart—however, using a sharp, sterilized knife is recommended to divide the plant into different sections.
- Snip away the dead roots and leaves from the divisions before planting them in separate pots, having your regular houseplant soil.
- Water well, and transfer them to a location that is warm, has constant temperature, and indirect or filtered sunlight.
5. Propagating Spider Plants from Seeds
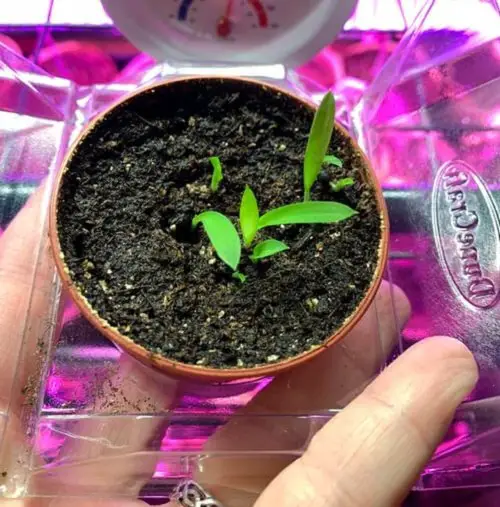
Rarely but sometimes, mature spider plants set seeds after flowering if the conditions are met and pollination occurs. You can collect them for propagating instantly. Buying seeds from a garden center or online is also an option, but it isn’t easy to find viable spider plant seeds because of their short storage life.
- Plant seeds in a seed starting mix. Do not sow them too deeply, just half an inch, and cover them with a thin layer of soil.
- You can also sow the seeds in a seed tray and keep them on a heating mat to speed up the process.
- Mist them evenly using a spray bottle, and keep the soil a little moist all the time.
- Within a couple of weeks, the seedlings will develop from the soil.
- Keep the emerging plants at a spot where they get bright light.
A Tip: As growing a spider plant from seeds needs some effort, growing it from division or plantlets makes a lot more sense.
FAQs
1. Can spider plants be propagated in low-light conditions?
While spider plants thrive in indirect light, low-light conditions may slow down the propagation process. It’s best to provide them with moderate to bright indirect light.
2. Are spider plants safe for pets?
Spider plants are generally considered safe for pets. However, some cats may find them attractive to chew on. If you have curious pets, consider placing spider plants out of their reach.
3. Can spider plants grow outdoors?
Spider plants can be grown outdoors in certain climates. They thrive in partial to full shade and well-draining soil. In regions with mild winters, they can be left outdoors year-round. You can learn more about it here!
4. What should I do if my spider plant is not producing spiderettes?
If your mature spider plant isn’t producing spiderettes, ensure it’s receiving adequate light and care. You can encourage spiderettes by providing the right conditions and patience and, of course, reading this informative article.