
Discover the art of cultivating with How to Grow Plumeria from Cuttings and get a guaranteed propagation of this flower!

This step-by-step How to Grow Plumeria from Cuttings guide will empower you with the knowledge and techniques needed to propagate this remarkable flower successfully!
Best Plumeria Varieties to Grow from Cuttings
When growing Plumeria from cuttings, you should go for the following Plumeria varieties as they are suited for the same:
- Plumeria ‘Celadine’
- Plumeria ‘Singapore White’
- Plumeria ‘Kauka Wilder’
- Plumeria ‘Pink Pansy’
- Plumeria ‘Golden Arrow’
- Plumeria ‘Mai Tai’
- Plumeria ‘Singapore Red’
- Plumeria ‘Aztec Gold’
- Plumeria ‘Samoan Fluff’
- Plumeria ‘Purple Jack’
Here are Different Types of Plumeria Varieties
When is the Right Time to Propagate a Plumeria Plant?
The most suitable time to propagate a Plumeria plant is during the warmer seasons of spring and early summer when the plant is actively growing. These periods provide optimal conditions for the successful development of roots and the establishment of new cuttings.
Plumerias thrive best in warm temperatures, typically ranging from 60°F to 85°F (15°C to 29°C). It is advisable to avoid propagating during the winter or colder months, as lower temperatures can hinder root formation and increase the likelihood of failure.
However, if you live in a warm climate zone, such as USDA Zones 9 to 11, or a region that is free from frost, you may have more flexibility and can propagate Plumeria plants throughout the year, including during the winter season.
How Long Does It Take to Propagate Plumeria?
The process of propagating Plumeria plants from cuttings typically requires a period of 6 to 8 weeks or more for the roots to fully form and become established. However, the exact timeframe can fluctuate depending on various factors, such as the environmental conditions present and the particular variety of Plumeria being propagated. In some cases, it may take even longer than 8 weeks for the roots to completely develop.
Follow these clever things when plants are young
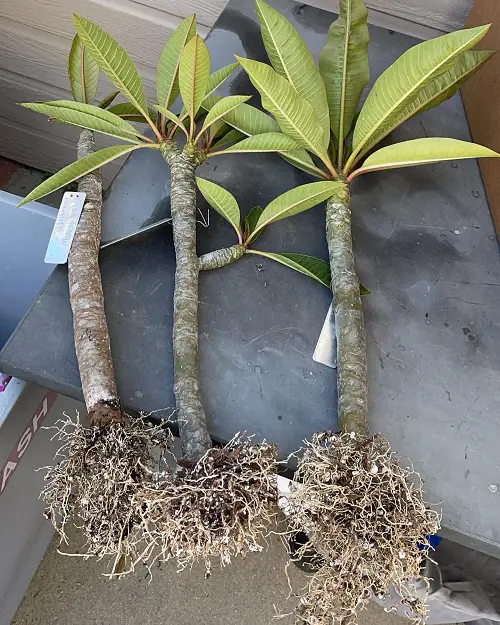
Ideal Size of Cutting for Propagating Plumeria

When propagating Plumeria plants, the recommended length for the stem cuttings is typically 10 to 15 inches. Cuttings within this size range are manageable and have a higher likelihood of becoming established successfully. It is crucial to select healthy and mature stems from the parent plant to increase the chances of effective propagation.
How to Grow Plumeria from Cuttings?
Things You’ll Need
- Pruning shears or a sharp knife
- Rooting hormone
- Potting mix (well-draining)
- Planting pots or containers
- Plastic bags or humidity dome
- Watering can or spray bottle
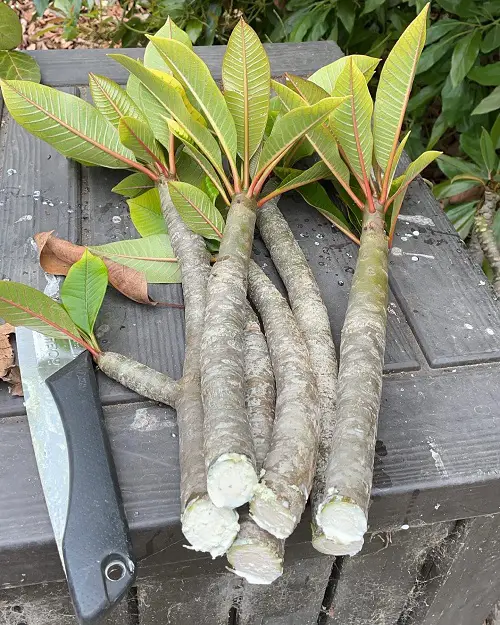
1. Selecting and Preparing the Cuttings
For the best chances of propagation success, carefully select vigorous and mature stems from your Plumeria plant as the source for your cuttings. Aim for stem lengths between 10-15 inches – this optimal size ensures the cuttings are sturdy yet manageable. Using a clean, sharp pruning shear or knife, make a precise cut just below a leaf node, allowing the plant’s natural healing process to begin.
Before planting, permit the freshly cut ends to callous over for a couple of days by letting them rest in a warm, dry spot. This crucial step helps prevent rot and encourages strong root development once planted.
2. Applying Rooting Hormone
Okay, it’s time to give those plumeria cuttings an extra boost! Grab your rooting hormone powder or gel – this magical stuff will encourage strong root growth. Dip the bottom ends of your cuttings into the hormone, making sure to coat them thoroughly. But be careful not to go overboard – a light coating is all you need. Give the cuttings a gentle tap to remove any excess hormone that may have piled on. Too much of a good thing can actually hinder the rooting process, and we don’t want that! With just the right amount of hormone, your cuttings will be primed and ready to sprout some seriously impressive roots.
3. Preparing Potting Mix
Grab yourself a well-draining potting mix – an equal blend of perlite for airiness, sand for drainage, and peat moss to hold just the right amount of moisture. Mix those ingredients together like a master chef whipping up a gourmet dish.
Once your potting mix masterpiece is ready, fill up some planting pots or containers. These little homes will provide the perfect environment for your cuttings to establish themselves and start putting down roots. Don’t be stingy with the mix – pack it in there nice and snug. With a well-draining yet moisture-retentive base, your plumeria babies will be off to a strong, healthy start!
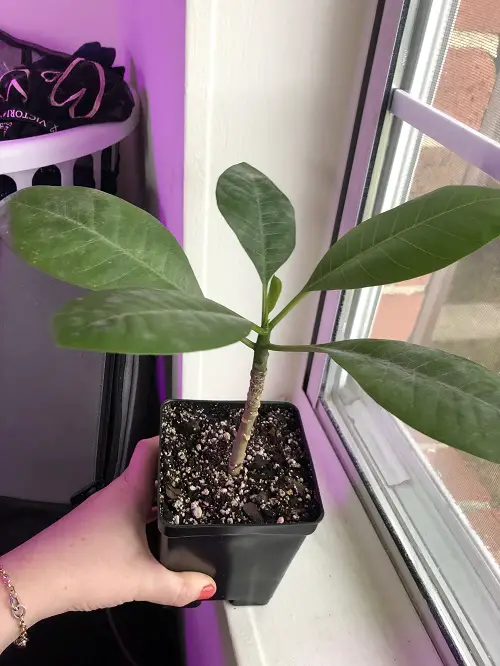
4. Planting the Cuttings
Insert the bottom end of the cuttings into the potting mix, burying about one-third of the length. As you’re nestling it in, make sure the potting mix is giving the cutting a firm embrace all around. We don’t want any air pockets or loose soil – that’s a recipe for sad, struggling roots. So pack that mix in there, almost like you’re giving the cutting a reassuring hug. With the mix in full contact, your cutting will feel right at home and will be motivated to start putting out those fresh, feisty roots.
5. Providing Proper Care
Place the planted cuttings in a warm and sunny location, preferably around 75-85°F (24-29°C). So, water them thoroughly, but mind you don’t drown the poor things. A good rule of thumb is to keep the soil slightly on the drier side, just how Plumerias like it.
Grab a plastic bag or a humidity dome and gently place it over your pots, being careful not to disturb the cuttings. This will create a lovely little microclimate, trapping in just the right amount of humidity to keep your cuttings feeling nice and comfortable as they work on putting down roots.
Here is Everything About Growing Plumeria in Pots
7. Monitoring and Root Development
Keep a close eye on those little cuttings – they’re working hard to sprout some roots! Periodically give them a gentle tug to see if you feel any resistance. That’ll be your first clue that those tiny root hairs are emerging. It’s an exciting milestone in their journey! While you’re checking on them, don’t forget to give their leaves a refreshing mist or two. It’ll help recreate that lovely humid microclimate inside their little plastic home. With a bit of tender loving care, those cuttings will be ready to really dig their roots into some fresh soil before you know it. Copy Retry
8. Transplanting
Once those cuttings have put down some serious roots – we’re talking a robust, healthy network after 6 to 8 weeks of patience – it’ll be time for the big move! Just be gentle during the transplanting process – after all, you don’t want to pull a muscle carrying heavy moving boxes on college move-in day! Take care of your plant babies and they’ll reward you by quickly settling into their new digs.
Ok I got two cuttings, & they are both now with leaves & doing well. BUT I live in location 7 in the country. I am at the moment bringing them inside at night & putting them out on the sunny patio during the 70-79 degree temps during the day & bringing them in at night. Suggestions to get them through the coming winter???? They are by a south facing French door but back about 6 feet from the south edge of the patio, so not direct sun. Plumeria is my favorite flower so I really want to keep them alive & hope someday they will bloom for me!!!