
Transplanting Ferns – if this sounds a little difficult to you, then this guide is for you! Follow our secrets for the best results!

What could be the key behind correctly Transplanting Ferns? How to know when would be the right time to do it and how to do it? Don’t worry! This comprehensive guide has expert techniques to help you out.
How to Know that It’s Time to Transplant Ferns?
As ferns grow and mature, they become too big for their current pots, leading to overcrowded roots. This makes the nutrients in the soil deplete and affects plant health.
When to Transplant a Fern?
The key to successful transplantation lies in recognizing the signs that your fern is ready to be moved. Watch out for these.
- Root Visibility: The roots have started growing out of the drainage holes.
- Stunted Growth: The growth of your fern has slowed down despite the care routine.
- Yellow or Wilted Leaves: Nutrient deficiencies due to exhausted soil–these manifest as yellow or wilted leaves.
- Frequent Watering Needs: Your ferns need more frequent watering because the soil can’t retain proper moisture (it dries out quickly).
Here’s How to Reduce Transplant Shock
Transplanting Ferns the Right Way
When to transplant ferns? The best time is either in the early spring, just before new growth starts, or in early autumn, as the plant is beginning to go dormant. During these periods, the plant is least likely to experience transplant shock. For people living in a tropical or warm climate, they can do this at any point of the year.
- Soil Quality: Choose soil that mimics the fern’s natural habitat, usually a rich, well-draining mixture high in organic matter.
- Light Conditions: Know the light requirements of your specific fern species and place them accordingly.
- Watering: Ferns prefer a moist environment but dislike waterlogged conditions.
- Spacing: Make sure to space the transplanted ferns according to their mature size, not their size at the time of transplanting.
Fern roots are often delicate and can be damaged easily. When removing the plant, aim to get as much of the root ball as possible to minimize root disturbance.
It’s also wise to water the fern an hour before you plan to transplant it; this will make the roots more flexible and less prone to breakage.
Pro Tip: Before transplanting, soak the fern’s root ball in a mixture of water and liquid seaweed extract. (2 parts water with 1 part seaweed) This can stimulate root growth and reduce transplant stress.
How to Transplant Ferns
Tools Required
- Trowel for digging
- Gloves to protect your hands
- Measuring tape for correct spacing
- A sharp, clean knife for dividing ferns, if needed
- Watering can or hose
- High-quality potting soil
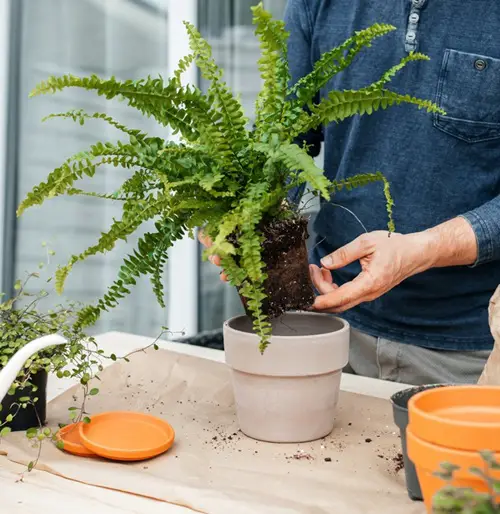
Water the fern well a few hours before transplanting to ease the removal process. Now, turn the pot sideways and hold the fern at the base of its leaves.
After that, tap the bottom and sides of the pot to loosen the soil and root ball. This will ease the root ball, which you can then pull out, supporting it as you do to prevent soil from falling away and roots from breaking.
Transplanting Process
Ferns transplanting is easy once you get the hang of it. Just fill up a new pot with a layer of soil and place the fern gently in the center. Use your hands to fill the areas around it with soil and press gently with your palms to remove air pockets. Now, give it a good soak and then place it in the new location.
Choice of Pot
You’ll need a pot that can allow the soil to breathe and is big enough for the plant to grow. Pick one that’s 2-4 inches larger than the current one – terracotta and ceramic ones are great choices.
Choice of Division
Since the fern is already out of its pot, dividing it at this stage saves you the extra work of removing it again later for division. Splitting a crowded root system can rejuvenate the plant, leading to healthier growth in both the new and original plants.
Dividing the plant can make it easier for the root system of each new plant to absorb nutrients, thus promoting better health. You effectively get more plants from a single parent plant, which is cost-efficient and allows you to populate more areas with ferns.
We have a great article on how to divide ferns properly
Aftercare for Transplanted Ferns
Monitor the fern carefully for the first few weeks, keeping the soil evenly moist and avoiding direct sunlight to minimize stress.
By paying attention to these crucial points, you can significantly improve the success rate of your fern transplanting efforts.