
Learn all about Repotting a Spider Plant through our detailed article and be the owner of a healthy and stunning Spider Plant.

Like every indoor plant, the Spider plant requires repotting depending on various factors. It helps this stunning plant in its overall well-being. Whether you are a beginner or a pro at repotting your Spider Plant, here is everything that you will need to know on How to Repot a Spider Plant.
Click here to Learn How to Make a Spider Plant Flower
Spider Plant Information
Spider plants are one of the most popular houseplants due to their low maintenance requirements and the numerous benefits they offer. These plants have long, slender leaves that arch gracefully from the center of the plant, and they produce small white flowers that develop into baby spider plants.
While spider plants are easy to care for, they will eventually outgrow their container and require repotting.
Learn about Growing Spider Plant at Home here
Why is Repotting Necessary?
Re-potting spider plants is necessary for several reasons.
- First, spider plants grow rapidly and need to be re-potted to provide them with more room to grow. If the pot is too small, the roots will become cramped and the plant will become stunted.
- Additionally, the potting soil in the pot can become compacted over time, reducing the amount of oxygen available to the roots. Re-potting the plant will allow for the soil to be replaced with fresh, oxygen-rich soil.
- Another reason to re-pot a spider plant is to provide it with additional nutrients. Over time, the nutrients in the potting mix will be depleted, and the plant will need more to continue to thrive. Re-potting the plant in a fresh potting mix will help to provide the necessary nutrients for the plant to remain healthy.
- Finally, re-potting a spider plant can also help to control pests and diseases. If the potting soil is harboring pests or diseases, re-potting the plant in fresh soil can help to eliminate these problems.
Learn about Growing Hawaiian Spider Plant here
When to Repot a Spider Plant?
- Age of the Plant: If your spider plant is over two years old, it’s probably time to repot. The roots of older spider plants tend to become pot-bound, making it difficult for the plant to absorb nutrients from the soil. A new pot with fresh soil can help to revitalize the plant.
- Outgrowing Its Pot: If you notice that your spider plant is growing faster than its current pot can accommodate, or you see its roots poking out of the drainage holes, it’s time to repot. Larger pots will give your plant more room to grow and spread its roots.
- Soil Quality: Over time, soil can become depleted of the nutrients needed to keep your spider plant healthy. If the soil looks especially dry, or if there are signs of nutrient deficiency (such as yellowing leaves), it’s a good idea to repot with fresh, nutrient-rich soil.
- Pest Infestation: If you notice any pests on the spider plant, such as aphids, spider mites, or mealybugs, it’s important to repot it immediately. Pests can quickly spread throughout the pot and infect other plants, so it’s best to remove the infested plant and start fresh with a new pot.
Look at the Best Spider Plant Varieties here
How to Re-pot a Spider Plant?
Here are the important steps to re-pot a Spider Plant:
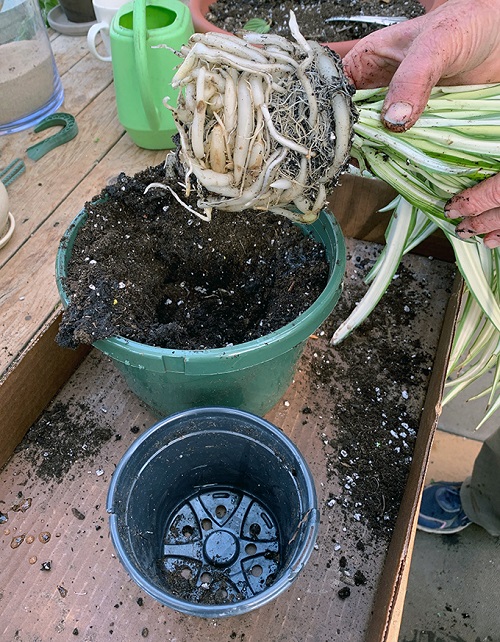
- Start by gathering the necessary supplies: a new pot (preferably one that is slightly larger than the current pot), potting soil, and a pair of gardening gloves.
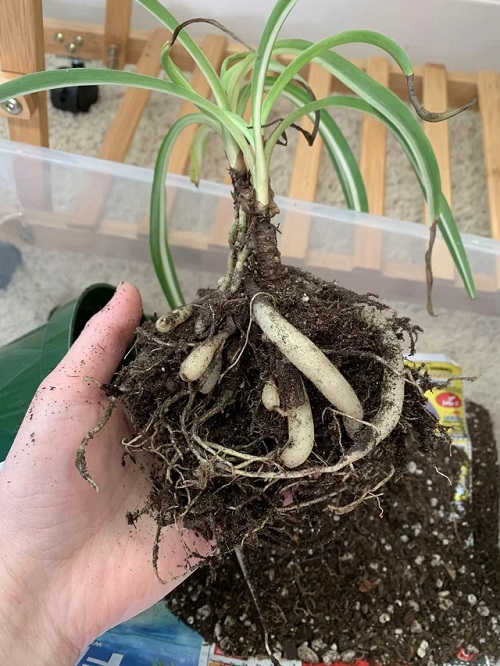
- Remove your spider plant from the current pot. Gently shake off the excess soil and inspect the roots for any signs of damage or disease.
- Place the new pot on a stable surface and fill it with potting soil, leaving an inch or two of space at the top of the pot.
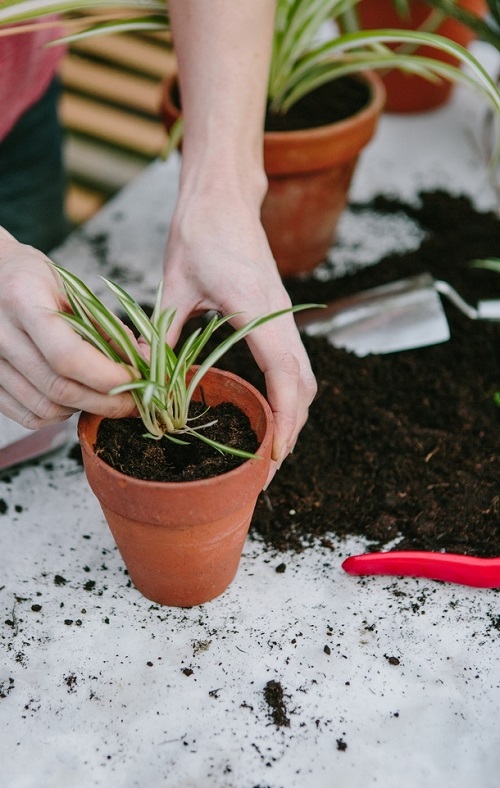
- Place the spider plant in the center of the pot and fill in the sides of the pot with soil. Make sure the plant is firmly planted in the soil and the top of the roots are level with the top of the soil.
- Gently press the soil around the plant to remove any air pockets.
- Water the soil until evenly moist.
- Place the potted spider plant in an area that receives bright, indirect light.
- Monitor the soil moisture of your spider plant. Make sure to water it regularly, but not too much.
Want to Grow More Pups of a Spider Plant? Learn here
Mistakes to Avoid When Repotting a Spider Plant 
Here are some of the mistakes that one should avoid while repotting a spider plant. It is necessary to avoid these mistakes as these can affect the overall growth and health of your spider plant:
1. Not removing the old soil: It is important to completely remove all the old soil from around the roots of the plant when repotting a spider plant. The old soil can become compacted and deprive the roots of oxygen, which can cause them to rot.
2. Not pruning the roots: Pruning the roots can help the spider plant to get enough oxygen and nutrients. It can also help to reduce the size of the plant, making it easier to re-pot. To prune, carefully remove any dead or damaged roots. Cut the roots into several pieces and then spread them out evenly in the new pot.
3. Not repotting into a larger pot: When repotting a spider plant, it is important to use a pot that is at least one size larger than the previous pot. This will give the plant more room to grow and will allow for better drainage.
4. Not adding enough fertilizer: When repotting a spider plant, it is important to add a balanced fertilizer to the soil. This will help the plant to get the nutrients it needs for healthy growth.
5. Not watering properly: Spider plants require regular watering, but it is important not to over-water them. Over-watering can cause the roots to rot and can lead to plant death. Water the soil only when it feels a bit dry to the touch.
6. Using a pot without drainage holes: Spider plants need well-draining soil, and using a pot without drainage holes can lead to waterlogged soil, which can cause root rot and other problems.
7. Using soil that does not drain well: It’s important to use well-draining soil when repotting a spider plant. Heavy clay soils can hold too much moisture and lead to problems like root rot.
8. Placing the plant in direct sunlight immediately after repotting: After repotting, spider plants can be sensitive to direct sunlight. Placing the plant in direct sunlight immediately after repotting can stress the plant and cause leaf burn.
9. Repotting during the plant’s dormant period in winter: Spider plants may go dormant in the winter, and repotting during this period can shock the plant and slow its growth.
10. Not removing dead or damaged leaves before repotting: Before repotting, it’s important to remove any dead or damaged leaves from the plant. This can help prevent the spread of disease and ensure that the plant is healthy before it goes into its new pot.