
Growing Mushrooms in Buckets is a best way to enjoy a good harvest in a limited space! Here’s a step by step guide in detail!
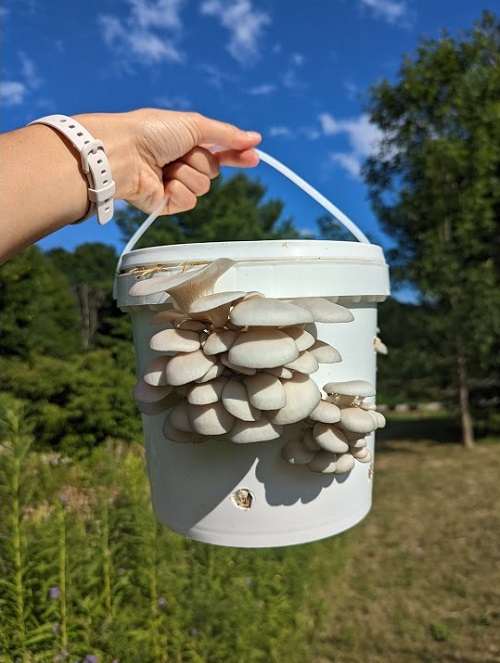
Growing Mushrooms in Buckets is an ingenious idea that’s great for anyone with a limited space like a patio or balcony! Let’s have a look at how to do it.
Check out the best edible long stemmed mushrooms here
Growing Mushrooms in Buckets – Materials Needed

- A 5-gallon plastic bucket with a lid
- Drill with 1/4 inch drill bit
- Hardwood pellets or straw as a growth medium
- Oyster mushroom spawn
- Spray bottle for water
- Clear plastic bag (large enough to fit over the bucket)
Read the List of Mushroom Types from A-Z here
Step by Step Process of Growing Mushrooms in Buckets
In this guide, we will use oyster mushrooms as an example because they are one of the easiest varieties to grow.
1. Prepare the Bucket
Using the drill, make a series of holes around the bucket, spaced about 2 inches apart. These holes should start about 4 inches from the bottom of the bucket and continue up to just below the rim.
The holes allow the mushroom mycelium to breathe and provide places where mushrooms can grow out.
2. Prepare the Growth Medium
If you’re using hardwood pellets, add warm water to them in a large container and mix them until they have a consistency like damp tobacco.
For straw, chop it up into small pieces and soak it in hot water for an hour, then drain it.
Learn Growing Mushrooms in Coffee Grounds here
3. Sterilize the Growth Medium
This step is to eliminate any potential competing organisms while Growing Mushrooms in Buckets. You can do this by baking it in the oven at 160-180°F (70-80°C) for an hour or so, or by pressure cooking it. Allow it to cool to room temperature before proceeding.
4. Inoculate the Substrate
Layer the bottom of the bucket with a couple inches of your prepared and cooled substrate. Then, evenly sprinkle a layer of your oyster mushroom spawn on top. Continue to layer substrate and spawn until the bucket is filled, finishing with a layer of substrate on top.
Learn Everything About Growing Fly Agaric Mushrooms here
5. Incubate the Bucket
Place the lid on the bucket loosely, so that some air exchange can still occur. Place the bucket in a location with a consistent temperature (ideally around 65-75°F or 18-24°C) and out of direct sunlight.
6. Monitor and Maintain Humidity
Spray the substrate with water every day or two to keep it damp but not waterlogged. If you live in a particularly dry area, you can place the clear plastic bag over the top of the bucket to help maintain humidity.
Here is How to Increase Humidity for Houseplants.
7. Wait for Mycelium Growth
After a week or two, you should start to see white mycelium growth spreading throughout the substrate from the spawn. This may take longer depending on the temperature and humidity conditions.
8. Initiate Fruiting
Once the bucket is fully colonized by the mycelium (i.e., it looks completely white), move the bucket to a cooler area with higher humidity, fresh air, and indirect sunlight. These conditions stimulate the mycelium to start producing mushrooms.
Find Plants that Don’t Like Mushrooms here
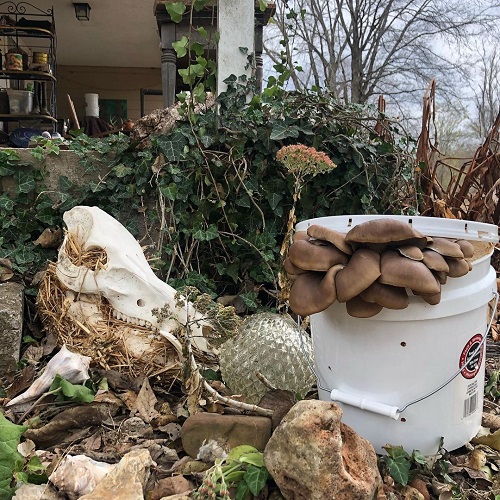
Harvesting
After moving to the fruiting location, small mushroom pins should begin to form within a week or so. These will grow rapidly into full-sized mushrooms over just a few days. Harvest them when the edges of the caps start to turn upwards by gently twisting and pulling them off.
Timing: The mushroom mycelium grows throughout the growth medium, and this typically takes 2-4 weeks. The fruiting phase, when the mushrooms actually grow, can take an additional 1-2 weeks. So, from start to finish, you can expect the process to take about 1-2 months.
Repeat the Fruiting Process
After your first harvest, you can often get several more flushes of mushrooms by continuing to maintain the conditions and humidity. Once the bucket stops producing, you can compost the substrate and start the process again with fresh substrate and spawn.
Remember to always work in as sterile an environment as possible, washing your hands and cleaning surfaces to prevent the introduction of mold or other contaminants that could outcompete your mushrooms. Enjoy your mushroom cultivation!