Do you know about the Common Rootbound Plant Symptoms? Here’s a complete list that will help you to spot it in the earliest stages.
Picture this: You’ve been diligently caring for your beloved houseplants, but something seems off. The once-vibrant leaves look weary, growth has come to a standstill, and no fertilizer or water regimen seems to do the trick. Could your plant be quietly screaming for help because its roots constricted like a genie in a lamp? Keep reading to know about Common Rootbound Plant Symptoms and set your green friends free for a healthier growth.
Find Mistakes to Avoid When Repotting Houseplants here
What it Means When a Plant is Rootbound?
When a plant is rootbound, it means that the roots have become overcrowded and constrained within the container or pot in which the plant is growing. This occurs when the plant has been growing in the same container for a prolonged period, and the roots have filled up the available space.
The root system is crucial for a plant’s overall health and well-being, as it absorbs water and nutrients from the soil, provides stability, and stores food reserves. When a plant becomes rootbound, its root system becomes constricted, limiting its ability to function optimally.
The crowded roots may struggle to supply sufficient water and nutrients, leading to various symptoms of stress and poor growth.
Common Rootbound Plant Symptoms
1. Stunted Growth
One of the most apparent signs of a rootbound plant is stunted growth. As the roots reach the edges of the container, they become constrained, limiting the plant’s ability to absorb water and nutrients effectively.
Consequently, the plant may experience slow or stunted growth, with smaller leaves and reduced overall size compared to healthy plants of the same species.
Find Tips on How to Revive a Stunted Houseplant here
2. Root Emergence and Overcrowding
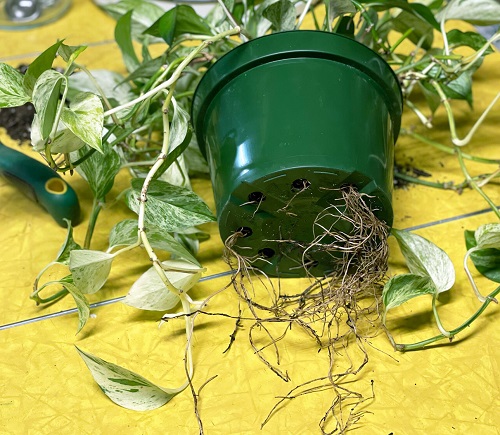
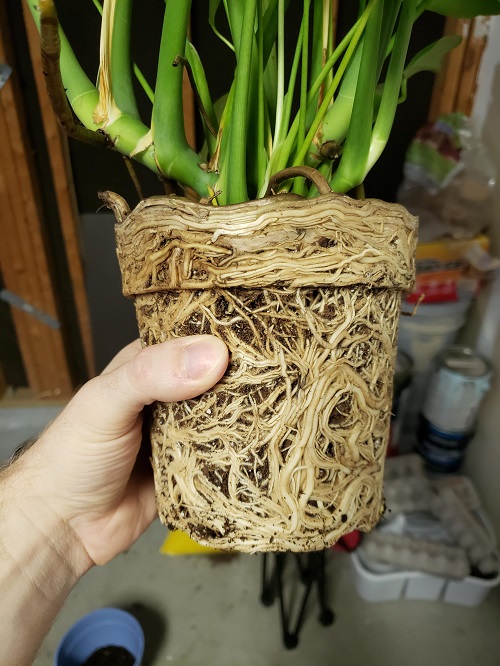
In severe cases of rootbound plants, you may notice roots emerging through the drainage holes of the container. The roots may appear tightly wound or even matted together, indicating that they have filled the available space.
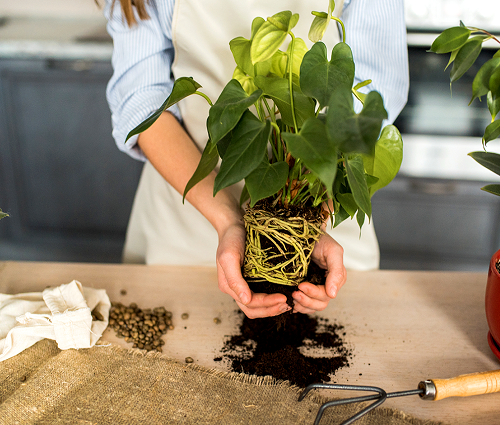
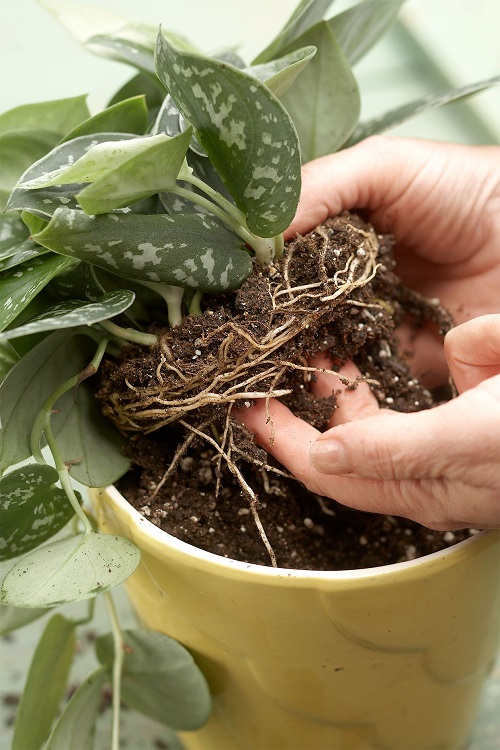
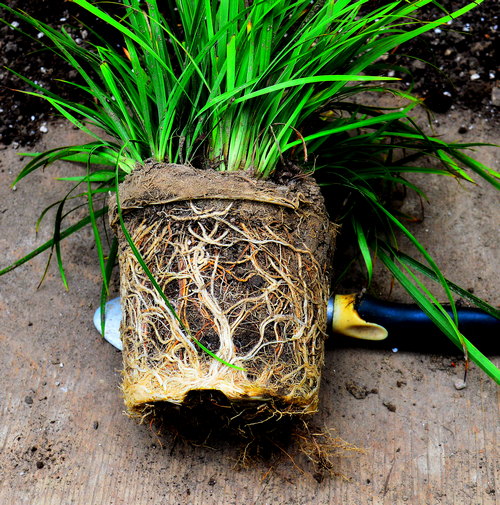
Rootbound plants exhibit an excessive amount of root growth within a limited space. When you gently remove the plant from its pot, you may notice a tangled mass of roots tightly distressed around each other.
The roots might form a dense ball, leaving little room for proper nutrient uptake and water absorption. In severe cases, the roots may even come out through the pot’s drainage holes.
3. Yellowing Leaves
Rootbound plants often display yellowing leaves, also known as chlorosis. The lack of sufficient space for root expansion leads to reduced water and nutrient uptake, resulting in nutrient deficiencies within the plant.
As a result, leaves may turn yellow, particularly starting from the bottom of the plant and progressing upward. In some cases, the yellowing may be accompanied by leaf drop.
PRO Tips and Tricks on How to Fix Yellow Leaves on Seedlings
4. Wilting and Dry Soil
Rootbound plants struggle to take up water because there is less volume of soil in the pot, which means a lack of moisture, and plant roots always have less water to supply. As a result, the plant may experience frequent wilting, always looking thirsty.
This occurs because the roots are unable to extract moisture adequately, leading to water stress within the plant. Additionally, the soil in the pot may dry out more quickly due to increased root density, further exacerbating the wilting symptoms.
Discover the Signs that Show Your Soil is Bad and You Should Discard It here
5. Reduced Flowering or Fruit Production

When the plants are slightly rootbound, you’ll experience more flowers and fruit production but once it passes this stage and becomes strictly roootbound–it starts to face challenges in allocating energy for flowering or fruit production. With limited access to nutrients, water, and oxygen, the plant’s resources are redirected toward survival rather than reproduction, and it begins to look tired and worn off.
Consequently, the plant may exhibit reduced or delayed flowering, resulting in fewer blooms or fruits than healthy plants of the same species.
How to Save a Rootbound Plant
To save a rootbound plant, it’s crucial to provide it with more space for root growth. Here are detailed steps to help you save a rootbound plant:
- Choose a Suitable Container: Select a new container that is one or two sizes larger (not more than that) than the current one. Ensure it has drainage holes to prevent waterlogging. The new container should provide enough room for the roots to expand without being excessively large, as overly large pots can lead to overwatering and soil moisture retention issues.
- Prepare the New Container: Fill the new container with a well-draining potting mix. Avoid using garden soil, as it may be too heavy and not suitable for potted plants. A high-quality potting mix formulated for the specific type of plant you have is recommended.
How to Make Your Own Potting Soil | Potting Mix Recipes For Everything
- Water the Plant: Before transplanting, thoroughly water the rootbound plant in its current container. This helps hydrate the roots and reduces stress during the transplantation process.
- Loosen the Rootball: Gently remove the plant from its current container. If the roots are tightly packed or circling around the rootball, use your fingers or a small tool to loosen and untangle them carefully. This process encourages outward root growth and prevents them from continuing to grow in a circular pattern.
- Prune Excessive Roots: If the root system is severely overcrowded, you may need to prune or trim some of the roots. Remove any damaged or dead roots, as well as excessively long or tangled ones. This step helps the plant redirect its energy towards new root growth.
- Place the Plant in the New Container: Position the plant in the center of the new container, ensuring that it sits at the same depth as it was in the previous container. Add additional potting mix around the sides, gently firming it down to provide support. Avoid compacting the soil too tightly, as it can hinder proper root development and water drainage.
- Water and Settle the Soil: After transplanting, thoroughly water the plant to settle the soil and eliminate air pockets around the roots. This helps establish good root-to-soil contact. Allow the excess water to drain away, ensuring that the container is not sitting in standing water.
How To Water Plants + 5 Watering Mistakes You’re Doing
- Adjust Care Routine: Once transplanted, adjust your care routine to meet the plant’s needs. This may include providing adequate sunlight, proper watering, and appropriate fertilization based on the specific requirements of your plant species.
- Monitor and Maintain: Regularly monitor the plant for signs of recovery and new growth. Be patient, as it may take some time for the plant to bounce back from being rootbound. Avoid overwatering, as the plant may still have a reduced root system and may be more susceptible to waterlogged conditions.

